
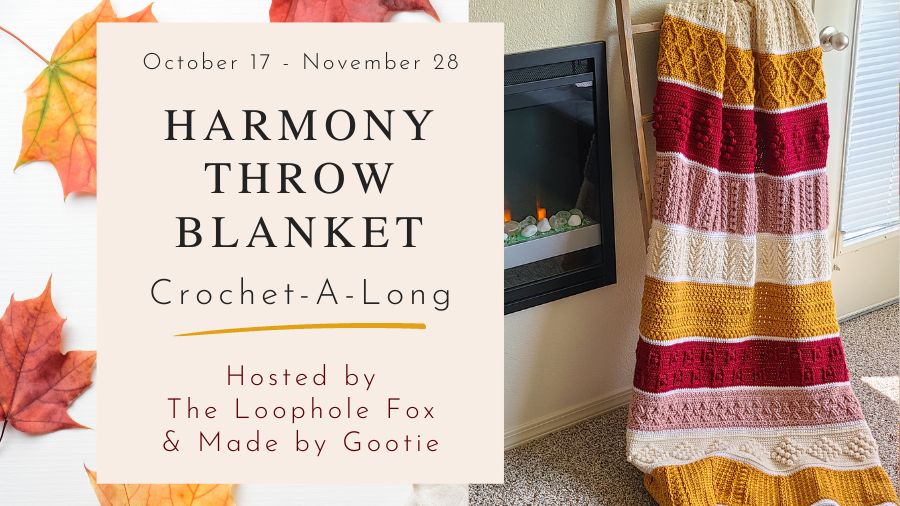
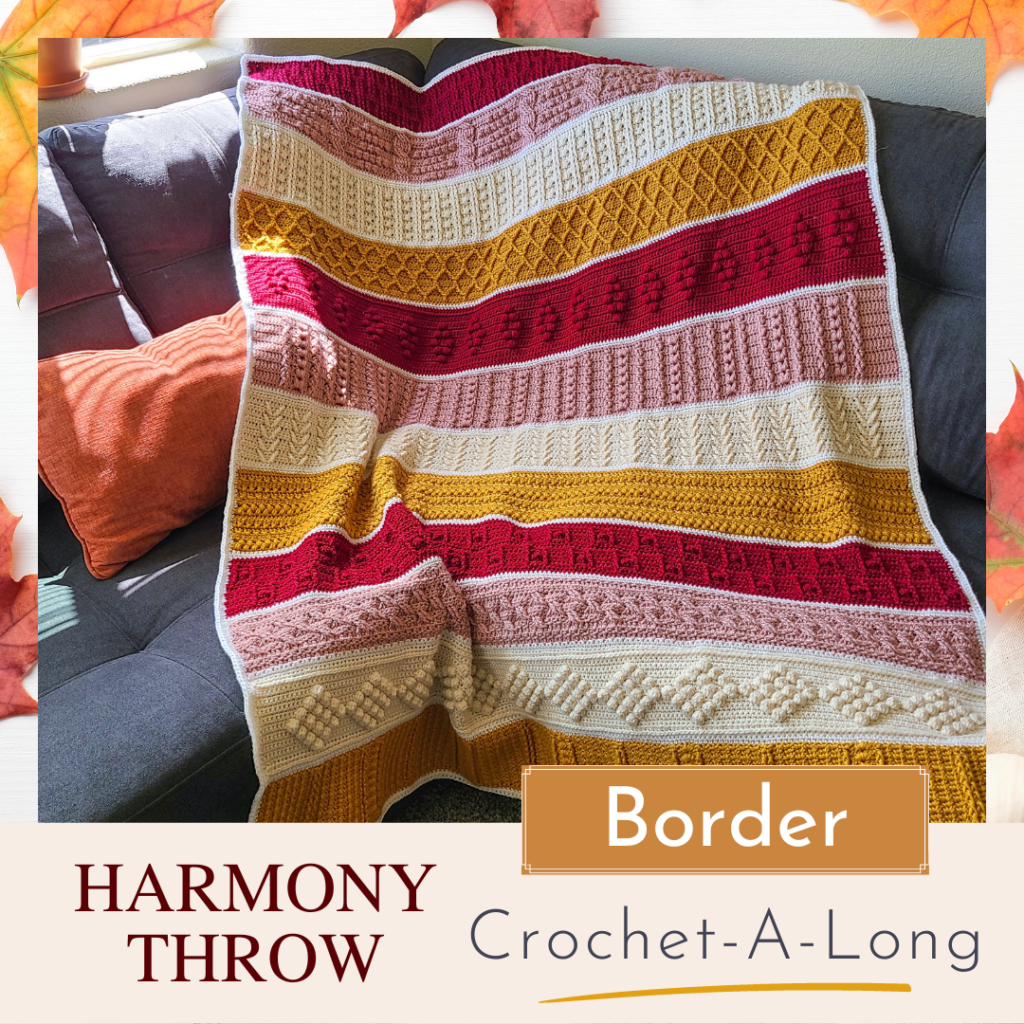
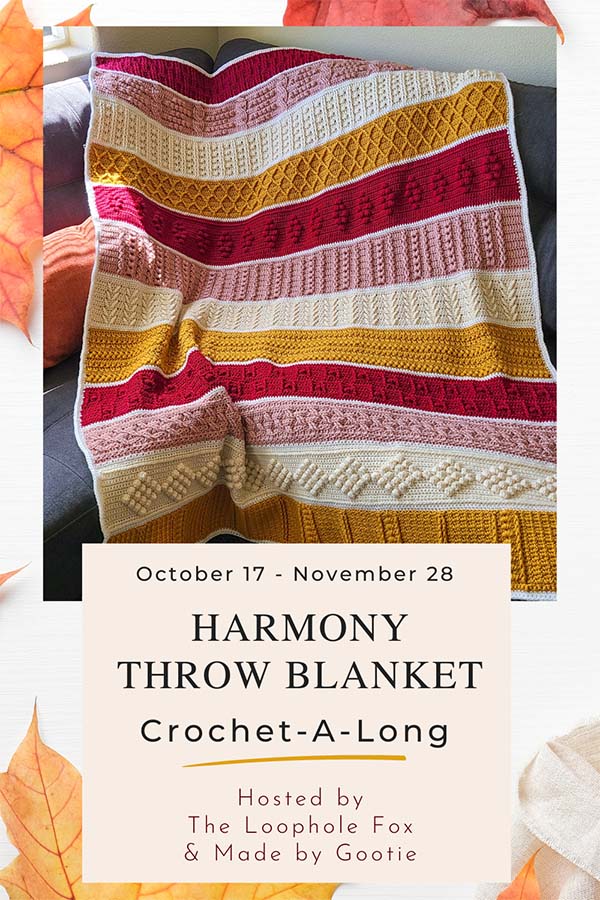
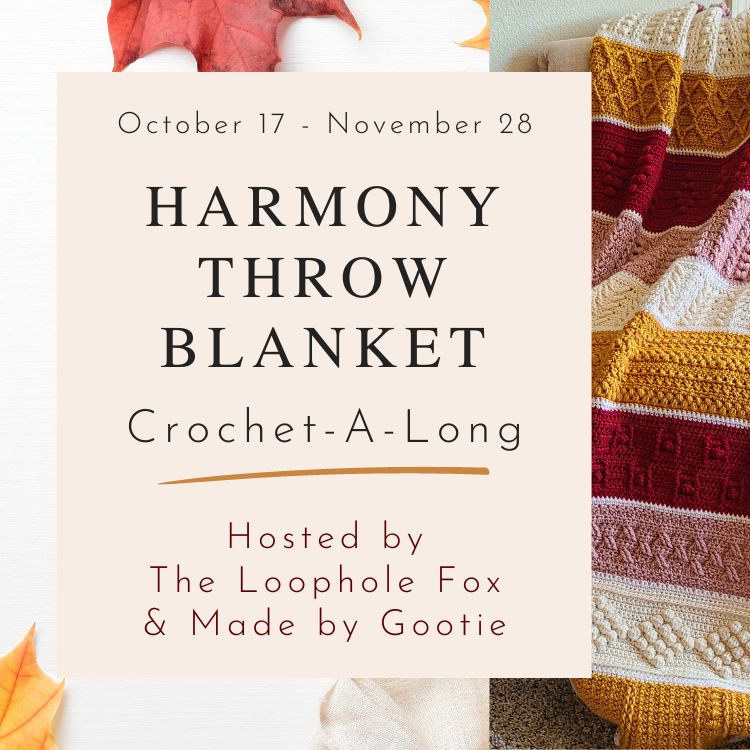
The Harmony Throw Blanket CAL
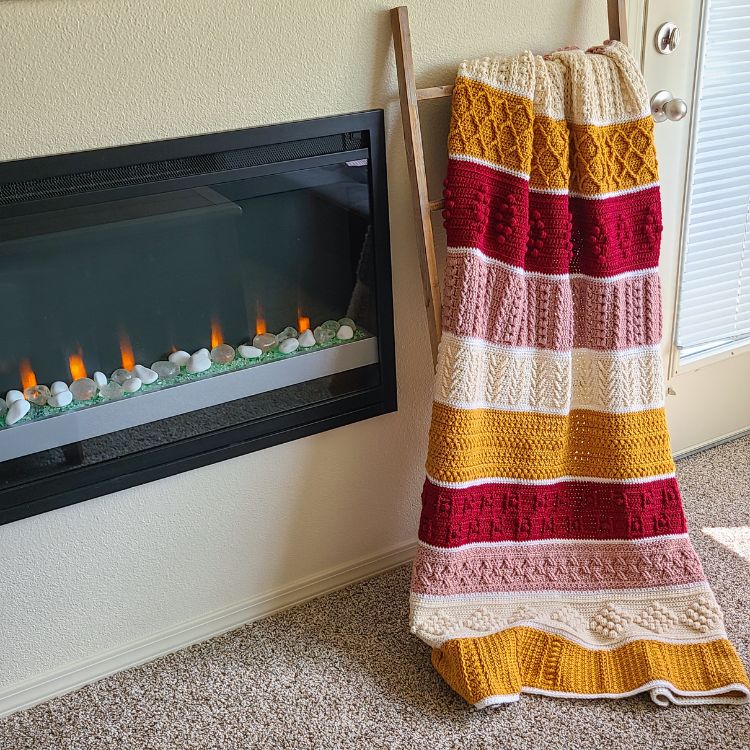
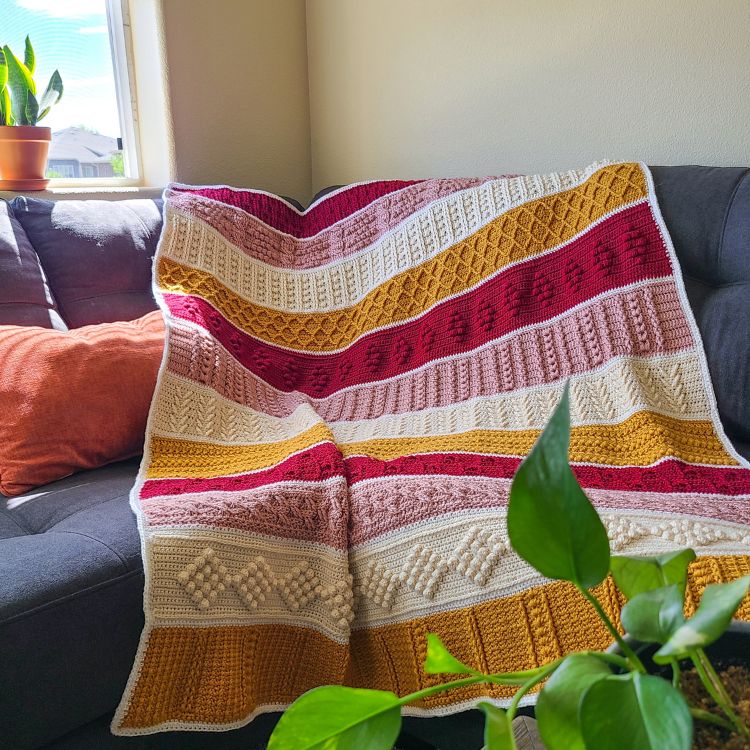
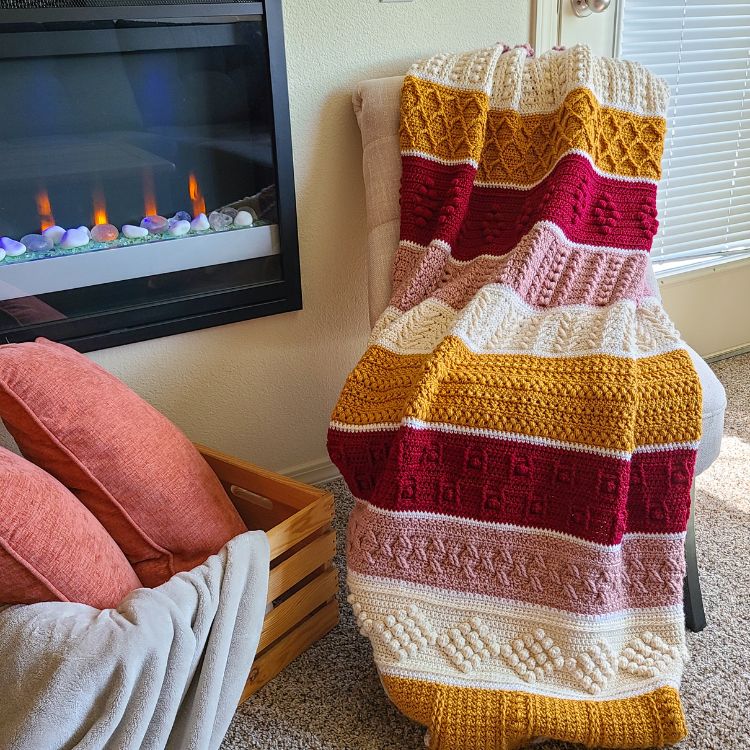
I am beyond excited to present to you the Harmony Throw Blanket. This lovely textured crochet blanket pattern boasts gorgeous stripes, interesting textures and structures and is a perfect cozy throw blanket to snuggle up in or display.
The best part about this textured crochet blanket pattern is that it is a collaborative crochet-a-long designed by 12 different designers, hosted by myself and the lovely Agat of Made by Gootie. Together we created Harmony and we can’t wait for you to crochet yours.
My absolutely lovely friend Agat of Made by Gootie and I began planning this textured crochet blanket pattern in the early months of 2022. Our ultimate goal for the finished blanket was that it would have loads of texture and be super cozy. I envisioned crocheters wrapping up in their blanket on a cool autumn night and myself cozying up with it and a nice big book.
Of course, we wanted to bring our other crochet designer friends into the fun with us and, I have to tell you, I could not be more impressed and in awe of how wonderfully all of our designs fit together.
What is a Crochet-a-long (CAL)?
Simply stated, a CAL (crochet-a-long) is a crochet pattern that is released in parts over a time period and crocheters make each part as it is released. Typically the parts of the pattern are released once or twice per week.
A CAL is so much more than that, though. Events like these allow crocheters to follow along with a pattern at the same time as others, be a part of a community of people all crocheting the same thing at the same time, ask questions and possibly learn new stitches, skills and techniques with the support of others.
This CAL was released in October 2022 and wrapped up at the end of November 2022. While the excitement of the release days is over, that doesn’t mean you can’t make your own Harmony Blanket!
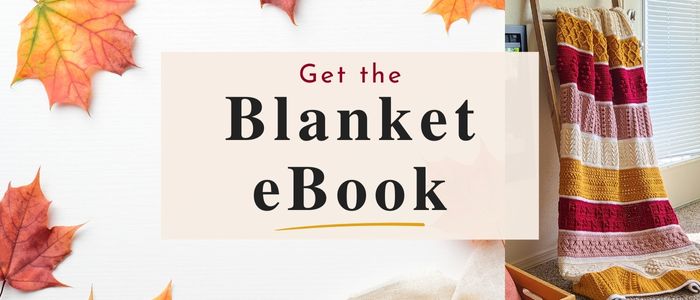
This textured crochet blanket pattern is still available to be made either using the free to view patterns on the designers blogs or by purchasing the Harmony Blanket eBook which will give you all of the patterns in their PDF format with a resource library, all the technical information you need, etc.
How does the Harmony Throw Blanket Pattern Work?
The Harmony Throw Blanket is a 50 inch x 60 inch textured crochet blanket pattern that was designed in 12 parts (or strips).
Each part was designed by a different crochet designer who is as lovely as they are talented. Unlike other collaborative blanket CALs you might have seen or been a part of, each part of this CAL is worked directly on top of the previous part so there is no seaming or fancy work involved in finishing the blanket. So you’ll be able to pick up the next part of the blanket pattern and continue working as if it was one pattern designed by one designer.
DISCLAIMER: This post includes affiliate links. This means, should you decide to purchase a product via one of these links, I will receive a small commission at no extra cost to you. I only recommend products I use and love (Or products I know others love, have heavily researched, know have good ratings and plan to purchase myself). These small commissions help to support this blog and continue keeping most of my patterns free. You can read more on my Privacy Policy, if you prefer.
Color Planning for this Textured Crochet Blanket Pattern
Would you believe me if I said picking colors for the Harmony Blanket was the hardest part? It was! Agat and I had so many ideas for colors that it was difficult to decide on one. When we came up with the palette we used, though, we both knew it was “the one”.
And, of course, I have to give a big massive love shoutout to Helen of Sunflower Cottage Crochet who was so lovely to provide yarn support for this project. Did you know she has started her own online yarn shop, Caterpillar Yarns? What a dream!
Yarn and Colors We Used
For this textured crochet blanket pattern, we used 5 colors. 4 of the colors were used for the different parts of the blanket (as you can see in stripes) and each color was used for 3 parts.
The 5th color we used for our transition rows and the border.
Here is the break down of our yarn and color usage (all usage is approximate):
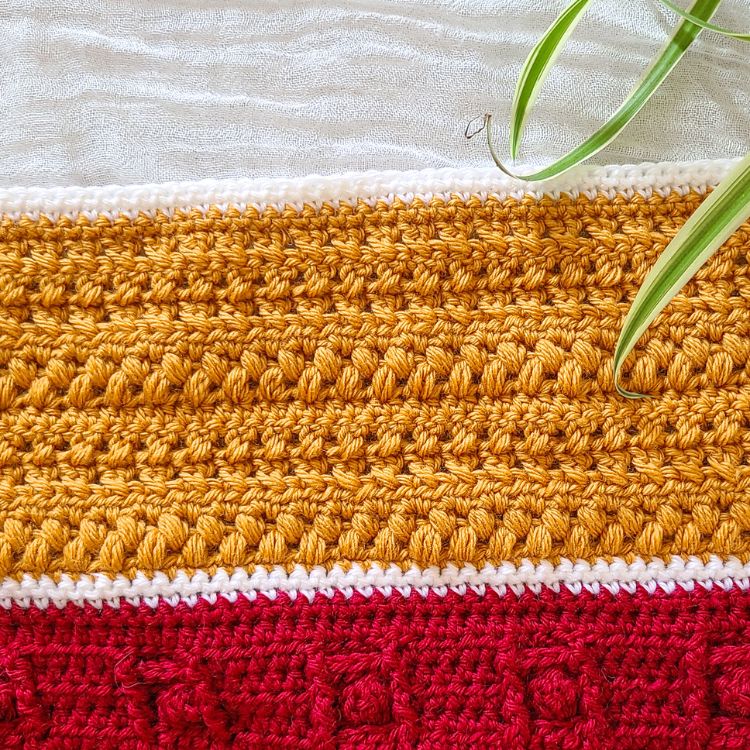
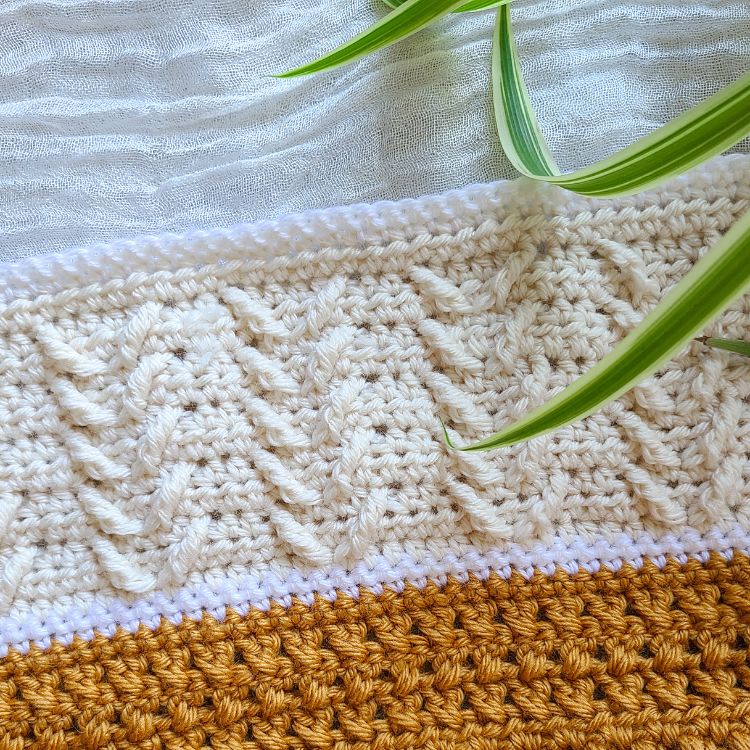
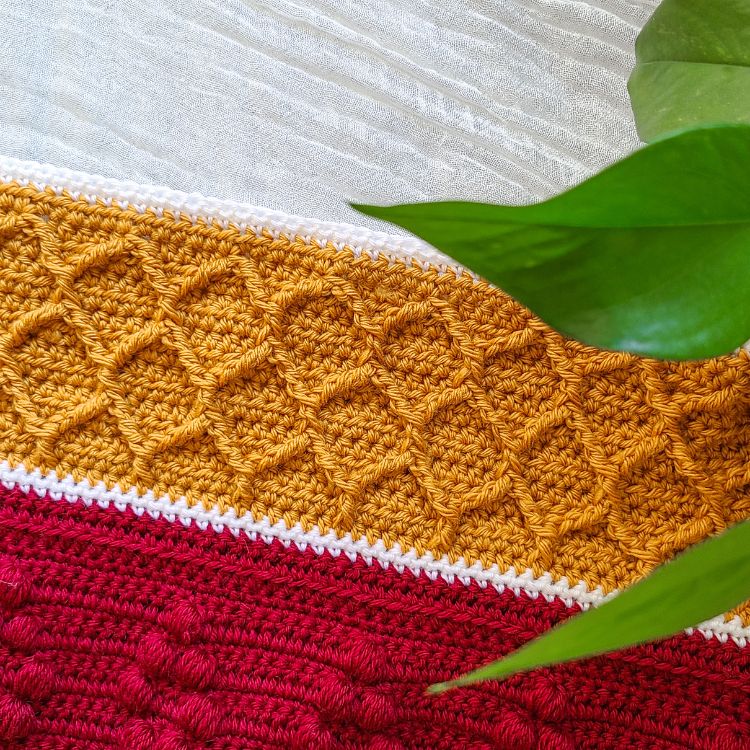
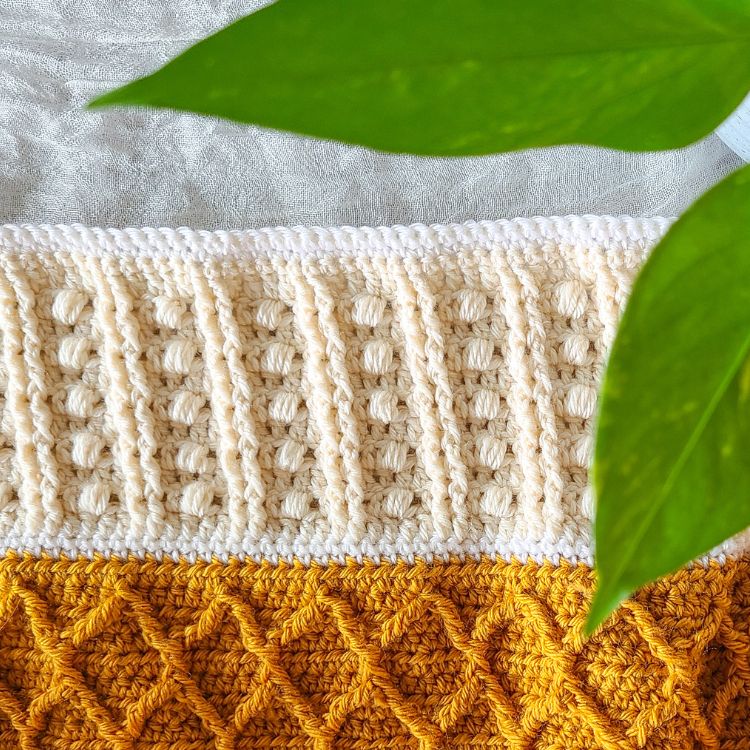
- Color A – Golden (Golden color; Parts 1, 5, 9):
- 487 grams / 1,066 yards (974 meters), 5 skeins
- Color B – Clotted Cream (Cream color, Parts 2, 6, 10):
- 367 grams / 803 yards (734 meters), 4 skeins
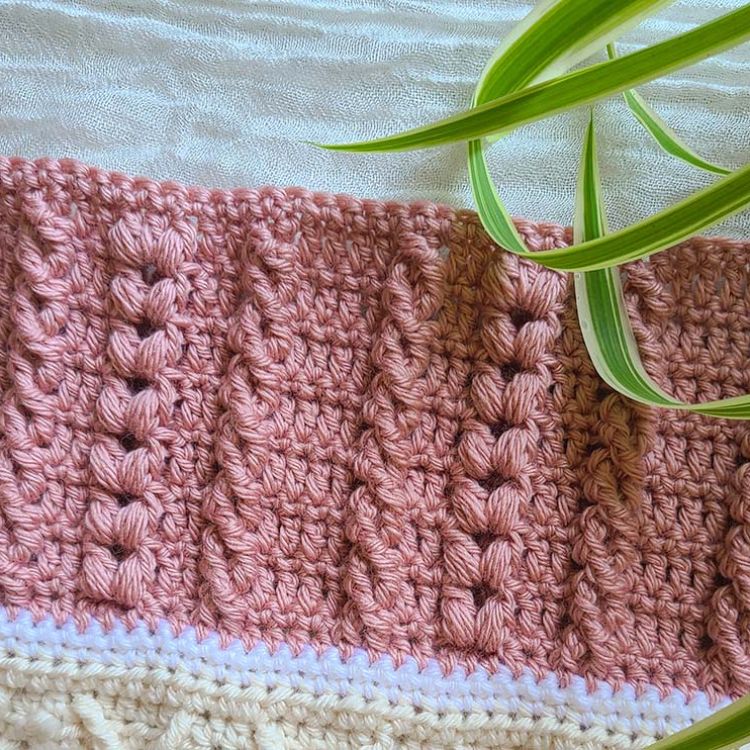
- Color C – Oyster (Soft pink color, Parts 3, 7, 11):
- 404 grams / 884 yards (808 meters), 4 skeins
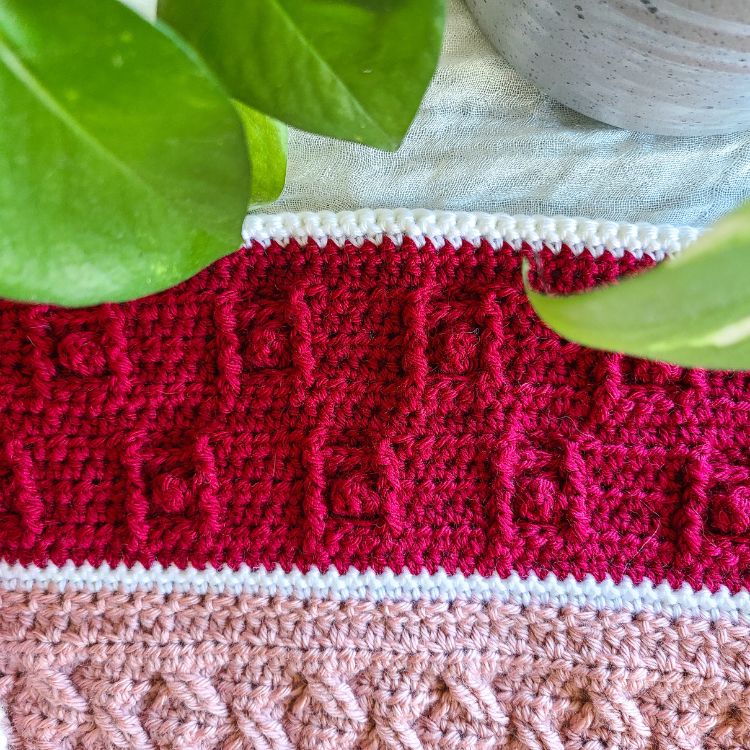
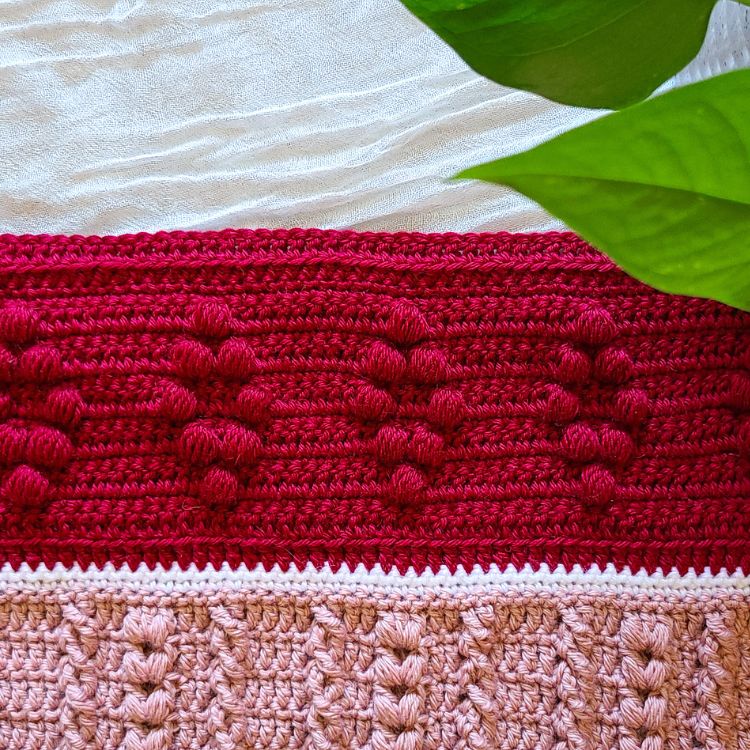
- Color D – Port (Deep red color, Parts 4, 8, 12):
- 418 grams / 915 yards (836 meters), 5 skeins
- Color E – White (Transition rows & border):
- 200 grams / 438 yards (400 meters), 2 skeins
You can, of course, choose any colors you like. If you’d like your blanket to have 1 color, 2 colors or multiple like ours did, that is completely up to you. Make the Harmony Throw Blanket yours!
Harmony Throw Blanket CAL Materials, Notes & Transition Row Instructions
Here’s everything you need to know before you get started on your Harmony Throw Blanket!
SKILL LEVEL
The skill level for this crochet blanket CAL ranges from Confident Advanced Beginner to Intermediate. It is likely that you will learn a new stitch or technique with this CAL and all of us designers will be right here to support you!
MATERIALS (Yarn, Tools & Notions)
YARN
- You will need Medium (4) Worsted Weight Yarn.
- We used Sirdar Country Classic Worsted for our sample blanket.
- Sirdar Country Classic is 50% wool, 50% acrylic.
- We received yarn support from the absolutely lovely Helen of Sunflower Cottage Crochet and her new adventure, Caterpillar Yarn. We are honored to have been able to receive yarn support from Helen and we are excited to help support her as she opens her yarn shop!
- Helen has put together two lovely kits to go with this blanket!
- The first kit is the Deluxe Harmony Throw Kit, which uses the same colors we used!
- The second kit has absolutely lovely colors, I’m sure you’ll love them!
- The total amount of yarn needed is approximately: 66.5 ounces / 1,876 grams / 4,103 yards / 3,752 meters
- Please see the breakdown of yarn and colors in the “Color Planning” section below.
If you’d like to substitute yarn, here are some good options:
Lion Brand’s Basic Stitch (100% Acrylic), Re-Spun (100% Recycled Polyester) or Color Theory (100% Acrylic) yarns.
Love Crafts Paintbox Simply Aran (100% Acrylic) or Paintbox Wool Mix Aran (50% Wool, 50% Acrylic).
We Crochet’s Shine Worsted (60% Pima Cotton, 40% Modal natural beech wood fiber).
TOOLS & NOTIONS
- 5mm (H-8) crochet hook
- At least 23 stitch markers (You will want all 23 for Part 6)
- Scissors
- Tapestry Needle
FINISHED SIZE
This textured crochet blanket pattern was designed to be 50 inches wide by 60 inches tall (127 cm x 152 cm).
Each part of the blanket is designed to be 50 inches wide and 5 inches tall.
TERMINOLOGY
All parts use US crochet terms.
OVERALL BLANKET NOTES
- This blanket has 192 stitches. Always make sure to count your stitches to ensure you have the correct stitch count at the end of each row and part.
- Part 1 does have an increased stitch count but is written to return back to 192. Make sure to follow the instructions.
- Each part is separated by 2 Transition Rows. Please review the Transition Row instructions below and make sure to work these rows between each part.
- Always finish the last stitch of your current Part with your Transition Row color.
- Always finish the last stitch of the second Transition Row with the color you’ve chosen for the next part.
- On this blog post, you will find links for relevant stitch tutorials for each featured Part. This should help with some of the more advanced stitches.
Transition Rows Instructions
Abbreviations (US)
ch – chain
sc – single crochet
st – stitch
Instructions
With the color chosen for your transition rows,
Row 1: ch 1 (does not count as a stitch), turn. 1 sc in each st across (192 sc).
Row 2: ch 1 (does not count as a stitch), turn. 1 sc in each sc across (192 sc).
Want all of this information in one easy to read document?
Harmony Throw Blanket CAL Patterns
Part 1 – Made by Gootie
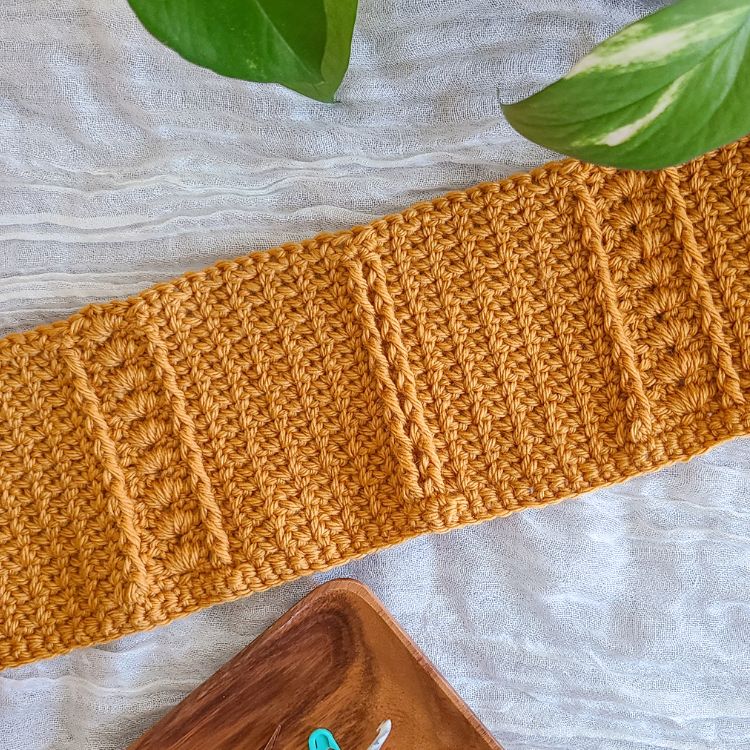
- Colorway Used: Color 1 – Golden
- Yarn Usage: Approximately 177 grams / 387 yards / 354 meters
- Stitch Markers Required: 5
How to get this pattern:
- Click the button below to head to the blog post for this pattern on the Made by Gootie website to view the free version (on the blog with ads) of this pattern.
Tutorial Links for Advanced Stitches in this Part:
- Spider Stitch Photo Tutorial or Video Tutorial
- Front Post Double Crochet Photo Tutorial
Special Notes for this Part:
- Agat has included a helpful video in her pattern for Rows 1 through 7, which will set you up to repeat the rows properly.
- I worked through Row 19 to reach 5 inches and then worked Rows 22 and 23 as written in the pattern.
- This is the only part in which the transition rows are worked slightly different. For the first transition row after this part, you will want to make sure to place 1 single crochet in each stitch and 1 single crochet in each chain 1 space across to maintain the 192 stitch count.
- The second row is simply 1 single crochet in each stitch across, like all other transition rows.
Part 2 – Sunflower Cottage Crochet
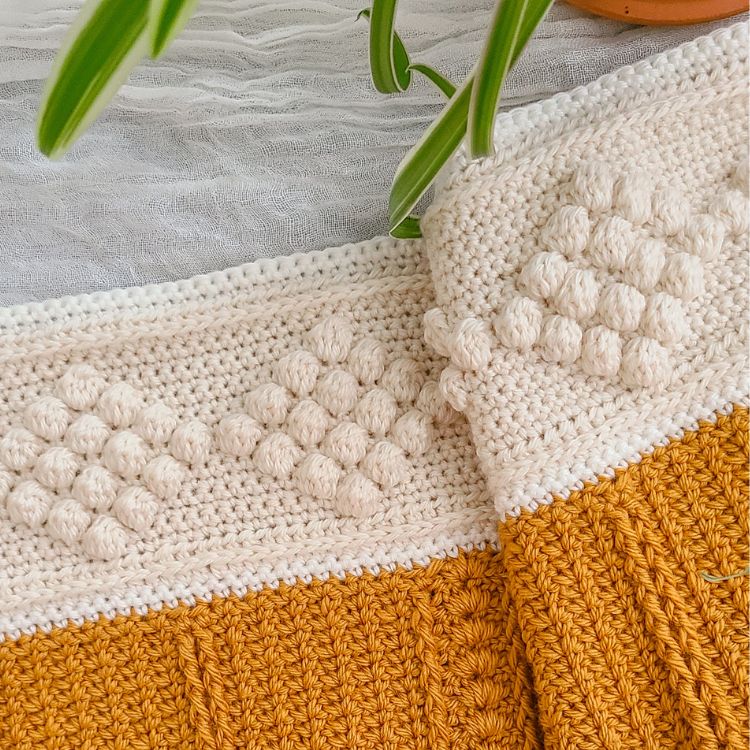
- Colorway Used: Color 2 – Clotted Cream
- Yarn Usage: Approximately 132 grams / 289 yards / 264 meters
- Stitch Markers Required: 0
How to get this pattern:
- Click the button below to head to the blog post for this pattern on the Sunflower Cottage Crochet website to view the free version (on the blog with ads) of this pattern.
Tutorial Links for Advanced Stitches in this Part:
- HDC in 3rd Loop (Camel Stitch) – Video Tutorial & Photo Tutorial
- Double Crochet Bobble Stitch – Photo Tutorial
Special Notes for this Part:
- Make sure to count stitches between your bobbles on the right side rows. The stitch just before a bobble “hides” a little bit and it’s very easy to drop stitches because of this.
- This part has a tendency to roll at the edges. This is nothing to worry about as the addition of the next section alleviates the roll.
- Follow the repeats on the wrong side rows EXACTLY as listed in the pattern or you may end up skewing your stitch count.
- It’s very easy to assume that you know how the row ends and continue crocheting. I admit that I did this when I crocheted this strip and ended up having to frog it. So make sure to follow the repeats exactly as stated.
Part 3 – HanJan Crochet
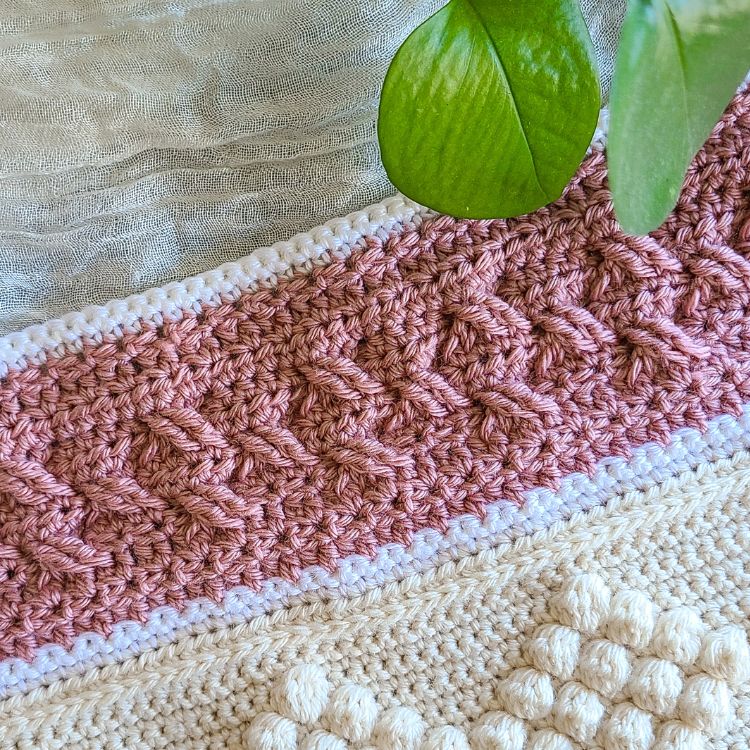
- Colorway Used: Color 3 – Oyster
- Yarn Usage: Approximately 100 grams / 218 yards / 200 meters
- Stitch Markers Required: 0, though you may want to have some available.
How to get this pattern:
- Click the button below to head to the blog post for this pattern on the HanJan Crochet website to view the free version (on the blog with ads) of this pattern.
Tutorial Links for Advanced Stitches in this Part:
- Extended Half Double Crochet – Photo Tutorial
- HDC in 3rd Loop (Camel Stitch) – Video Tutorial & Photo Tutorial
- Front Post Stitches (This is a tutorial for the Front Post Double Crochet, see note in post regarding Treble Stitch) – Photo Tutorial
- Front Post Treble Crochet 2 Rows Below + Skipping Stitches & Working in Skipped Stitches – Photo Tutorial
Special Notes for this Part:
- This section rolls a bit until the last two rows of the pattern are put on.
- Tip: It’s easier to count the posts of the stitches 2 rows below between the Front Post Treble Crochets than it is to count the tops of stitches and move downward.
- DO make sure that it looks like you’re skipping 4 stitches behind the 4 Front Post Treble Crochets of each set.
Part 4 – Clair de Lune Fiber Art
- Colorway Used: Color 4 – Port
- Yarn Usage: Approximately 123 grams / 269 yards / 246 meters
- Stitch Markers Required: 0
How to get this pattern:
- Click the button below to head to the blog post for this pattern on the this website to view the free version (on the blog with ads) of this pattern.
Tutorial Links for Advanced Stitches in this Part:
- Front Post Double Crochet – Photo Tutorial
- Back Post Double Crochet – Photo Tutorial
- Treble Bobble Stitch (This is a tutorial for the Double Crochet Bobble Stitch, see note at bottom of post regarding using Treble Crochet) – Photo Tutorial
Special Notes for this Part:
- This part is fairly easy and straightforward to work, especially as you should be familiar with post stitches and bobbles after the previous parts.
Part 5 – Fosbas Designs
- Colorway Used: Color 1 – Golden
- Yarn Usage: Approximately 152 grams / 332 yards / 304 meters
- Stitch Markers Required: 0
How to get this pattern:
- Click the button below to head to the blog post for this pattern on the Fosbas Designs website to view the free version (on the blog with ads) of this pattern.
Tutorial Links for Advanced Stitches in this Part:
- Bean Stitch – Photo Tutorial
- Crossed Double Crochet – Photo Tutorial & Video Tutorial
Special Notes for this Part:
- Watch stitch count on the HDC rows after the bean stitches. It’s easy to lose count!
Part 6 – Ned & Mimi
- Colorway Used: Color 2 – Clotted Cream
- Yarn Usage: Approximately 110 grams / 240 yards / 220 meters
- Stitch Markers Required: At least 23
How to get this pattern:
- Click the button below to head to the blog post for this pattern on the Ned & Mimi website to view the free version (on the blog with ads) of this pattern.
Tutorial Links for Advanced Stitches in this Part:
- Front Post Double Treble Crochet –Photo Tutorial
- If you have never worked a US Double Treble Crochet Stitch, please see this Photo Tutorial before following the tutorial for the Front Post Double Treble Crochet.
- Front Post Treble Crochet 2 Rows Below + Skipping Stitches – Photo Tutorial
Special Notes for this Part:
- Follow Sarah’s recommendation of using the stitch markers. It makes Row 3 significantly easier, especially if you aren’t used to working Front Post stitches two rows below.
- The repeats of Row 3 are much easier as the pattern has already been established.
- For reference, the first FPdtr (US Front Post Double Treble Crochet) is in the second post of the 4 stitches between the V’s and the second FPdtr is in the 3rd post.
Part 7 – The Loophole Fox
- Colorway Used: Color 3 – Oyster
- Yarn Usage: Approximately 160 grams / 350 yards / 320 meters
- Stitch Markers Required: 0, though you might find them handy to have
How to get this pattern:
- Click the button below to head to the blog post for this pattern on this website to view the free version (on the blog with ads) of this pattern.
Tutorial Links for Advanced Stitches in this Part:
- Front Post Treble Crochet (This is a tutorial for the Front Post Double Crochet, see note in post regarding Treble Stitch) – Photo Tutorial
- Back Post Double Crochet – Photo Tutorial
- Puff Stitch – Photo Tutorial
Special Notes for this Part:
- The PDF of this pattern has a full step by step photo tutorial to help you through. You will receive the full PDF when you download this pattern for free.
Part 8 – Knitting with Chopsticks
- Colorway Used: Color 4 – Port
- Yarn Usage: Approximately 160 grams / 350 yards / 320 meters
- Stitch Markers Required: 0
How to get this pattern:
- Click the button below to head to the blog post for this pattern on the Knitting with Chopsticks website to view the free version (on the blog with ads) of this pattern.
Tutorial Links for Advanced Stitches in this Part:
- Puff Stitch – Photo Tutorial
Special Notes for this Part:
- Make sure to put the single crochet in the top of the puff stitch, not the chain 1. If you accidentally do it in the chain 1, it can skew the diamond.
- Hortense mentions this in her pattern but I still accidentally put it in the chain 1 for one of the puff stitches in the last couple of rows which skewed the diamond. I had to “frog” and rework the row – I don’t want this to happen to you! 🙂
Part 9 – Raffamusa Designs
- Colorway Used: Color 1 – Golden
- Yarn Usage: Approximately 158 grams / 345 yards / 316 meters
- Stitch Markers Required: 0, though you might find them handy
How to get this pattern:
- Click the button below to head to the blog post for this pattern on the Raffamusa Designs website to view the free version (on the blog with ads) of this pattern.
Tutorial Links for Advanced Stitches in this Part:
- Honeycomb Stitch – Video Tutorial
Special Notes for this Part:
- The pattern states to repeat a set of rows to your desired height. I worked a total of 14 rows to reach approximately 5 inches.
- Make sure you end on a Wrong Side (WS) row.
- Raffaella’s photo tutorial for this stitch is very helpful!
Part 10 – Hooks, Books & Wanderlust
- Colorway Used: Color 2 – Clotted Cream
- Yarn Usage: Approximately 125 grams / 274 yards / 250 meters
- Stitch Markers Required: 0
How to get this pattern:
- Click the button below to head to the blog post for this pattern on the Hooks, Books & Wanderlust website to view the free version (on the blog with ads) of this pattern.
Tutorial Links for Advanced Stitches in this Part:
- Front Post Double Crochet – Photo Tutorial
- Back Post Double Crochet – Photo Tutorial
- Puff Stitch – Photo Tutorial
Special Notes for this Part:
- I ended up working 1 extra repeat of Rows 2 and 3 to bring the height up as the row needed an extra inch with my tension.
Part 11 – Juniper and Oakes
- Colorway Used: Color 3 – Oyster
- Yarn Usage: Approximately 144 grams / 314 yards / 288 meters
- Stitch Markers Required: 0
How to get this pattern:
- Click the button below to head to the blog post for this pattern on the Juniper and Oakes website to view the free version (on the blog with ads) of this pattern.
Tutorial Links for Advanced Stitches in this Part:
- Front Post Stitches (Double Crochet & Treble Crochet) – Photo Tutorial
- Back Post Double Crochet – Photo Tutorial
- Double Crochet Bobble Stitch – Photo Tutorial
- Erin has included a full video tutorial for her part!
Special Notes for this Part:
- Despite being probably the most intermediate pattern of this CAL, I found this one to be very easy. Erin has included photo and video tutorials which crocheters should rely on if needed.
- The hardest part of this section was in Row 5, in which you place 1 BPdc in each of the 6 FPtr which are crossed from the previous row. The difficult part was making sure to place them properly. It helped to push the other FPtr’s out of the way to ensure that they were straight across and not also twisted.
Part 12 – Remington Lane Crochet
- Colorway Used: Color 4 – Port
- Yarn Usage: Approximately 135 grams / 296 yards / 270 meters
- Stitch Markers Required: 0
How to get this pattern:
- Click the button below to head to the blog post for this pattern on the Remington Lane Crochet website to view the free version (on the blog with ads) of this pattern.
Tutorial Links for Advanced Stitches in this Part:
- Placing Front Post Double Crochets on Single Crochets – Photo Tutorial
- Row 1 of this Part has Front Post Double Crochets in the instructions. Because this Row is worked on the transition rows of Single Crochets, you will need to place Front Post Double Crochets on Single Crochets which may be unfamiliar.
- Front Post Double Crochet – Photo Tutorial
- Back Post Double Crochet – Photo Tutorial
Special Notes for this Part:
- The hardest part of this pattern is the first row. We are working FPdc around single crochets, which may be unfamiliar to you. Make sure to check out the photo tutorial for placing Front Post Double Crochets on Single Crochets linked above.
- Otherwise this pattern is straightforward!
Harmony Throw Blanket Border
- Colorway Used: Color 5 – White (Same as Transition Rows)
- Yarn Usage: Approximately 90 grams/ 197 yards (180 meters)
- Stitch Markers Required: 0
How to get this pattern:
- Click the button below to head to the blog post for this pattern on this website to view the free version (on the blog with ads) of this pattern.
Did you love this textured throw blanket pattern and want to make sure you don’t miss future events like this one?
Get all the fun sent directly to your inbox!
Sign up to my newsletter to make sure you don’t miss any future events that will be as lovely and fantastic as this one.
No spam, ever. Just crochet goodies. Pinky Promise!
Love this textured crochet blanket pattern and want to save it for later? Pin it to Pinterest!
FAQ for the Harmony Throw Blanket
What do I need to know about gauge and tension?
This textured crochet blanket pattern CAL started with a swatch and my tension. I am typically a tight crocheter, so my tension is typically tighter than others. You can find out more about what this means in my gauge master post.
Each designer has listed gauge for their patterns, which is standard for all crochet patterns. However, for full transparency, when I crocheted the sample of the blanket I did not not check gauge between each pattern and the blanket turned out perfectly.
What this means is you will want to match the gauge of the first designer or, if you feel confident in your own gauge, you can follow your own. You shouldn’t have to match gauge with each designer.
Your blanket should turn out to be approximately 50 inches wide by 60 inches tall. If it is slightly too small, you can always add more of a border to increase the size. If it is slightly too large… well, who would ever deny a big ol’ blanket!?
What stitches and/or techniques should I be familiar with to feel confident following this textured crochet blanket pattern?
As stated previously, the range of skill level for this textured crochet blanket pattern is from Confident Advanced Beginner to Intermediate. You very likely will learn new stitches and/or techniques following this CAL.
You should be familiar and confident with all of the basic crochet stitches such as chains, slip stitch, single crochet, half double crochet, double crochet and treble crochet.
You should also be familiar with or familiarize yourself with the following stitches and techniques:
- Front Post and Back Post Double Crochet
- Double Treble Crochet (and how to Front Post Double Treble Crochet)
- Puff Stitch (and it’s variants)
- Bobble Stitch
- Working Front Post Stitches 2 Rows Below (Plus skipping stitches and crossing stitches)
- Spider Stitch
- Camel Stitch (Half Double Crochet 3rd Loop Only)
- Extended Half Double Crochet
- Placing front post stitches on single crochets
This list uses US terms and each link will take you to a tutorial to learn these stitches or techniques.
Each part of the textured crochet blanket pattern will reference which techniques you should know with links to tutorials and any other notes that might help.
Don’t forget to join my Facebook Group so we can chat all about your creations! We are a group for crocheters of all experiences, all interests and love to hang out together. Come join the fun!

Shannon | Designer & Editor
Shannon helps crocheters find their next project and build their skills with in depth tutorials and crochet patterns on her blog, theloopholefox.com.
With more than a decade of crochet experience, Shannon knows that understanding why we do something matters just as much as how we do it. She teaches new techniques and crochet stitches in depth so you can crochet with confidence.
Looking for more Crochet Blanket Patterns? Try these!
Want a simple blanket to work on while you wait for more parts of the Harmony CAL to release? Try my Aspen Throw!
If you love baby blankets, you’ll love these Crochet Baby Blanket Patterns!
If you want some quick projects you can work on while waiting, you can try out some of my Crochet Blanket Squares!
A gorgeous blanket from all my favorite designers? I’m in! I’m sure a CAL like this requires a great deal of planning and collaboration, so thank you so much for sharing it with us. Looking forward to 10/17. I hope you all will also share tips and tricks on your blogs for those of us not on Facebook. Thank you!
Oh my gosh, Judy! Thank you for such a kind comment. I’ll be sure to share this with the other designers! 🙂 It has taken months of planning but Agat and I have loved every minute of it!
We do plan to include the tips and tricks on our blog posts, directly under the information for each part, so that way everyone will have access to all the information. 🙂
This will be my first crochet a long! I’m really excited. So glad I found your group ❣️
Oh my gosh, your first CAL! How exciting and I am absolutely honored that you’ll be choosing ours as your first one. We are so excited to have you with us!
This blanket is absolutely beautiful. I can’t wait to make it!
I’m so glad you like it! We are so happy with how it turned out and can’t wait to see yours!
I am unable to find any information for the release of part 1 to obtain the code or even the pattern info on the designers website for the Oct 17 release.
Hi there! Thanks so much for reaching out. Each time a new part releases, it goes live at 8 AM PDT. It has just turned 8 AM PDT now, so you will be able to see all the information for the first part now. 🙂